Blog · By The Packaging Vista Team · June 20, 2026
Packaging Artwork & Dielines: How to Set Up Print-Ready Files
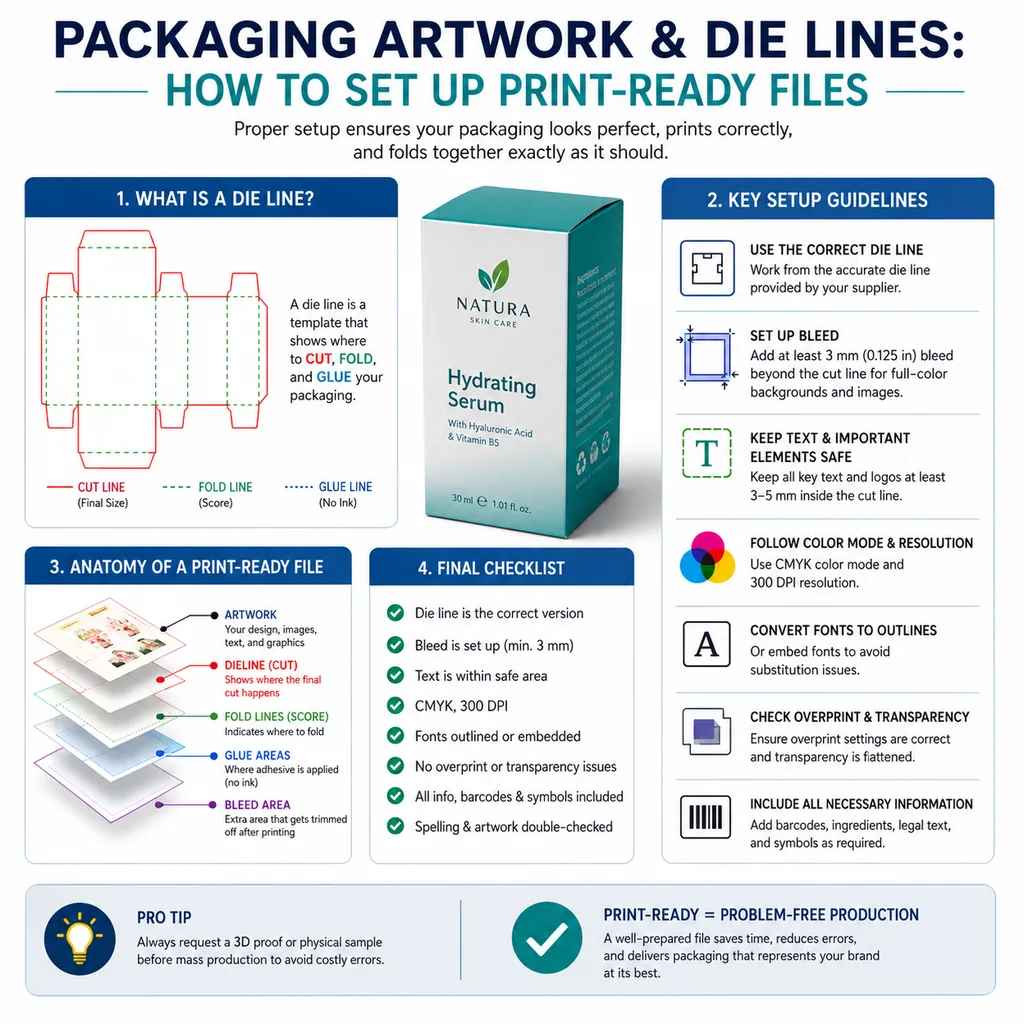
A dieline is the flat blueprint your box is printed and cut from – it shows where the material is cut, folded, and glued. Getting artwork onto it correctly is what separates a crisp, professional box from a misprinted one.
The good news: you do not have to master this yourself. We build the dieline free and our design team preps your file. Understanding the basics helps you supply better artwork and avoid surprises. You can request a free quote and a free dieline anytime - for any structure, from mailers to precision die-cut boxes and cartons.
Key takeaways
- The dieline is the blueprint: design your artwork onto it, not next to it.
- Mind bleed and safe zones: extend background past the cut, keep text inside.
- Use vector and CMYK: vector art and print color keep results sharp and accurate.
- Or just send a logo: our free design team will do the setup for you.
What is a dieline?
A dieline is a 2D template of your box laid out flat, with lines that mark every cut, fold, and glue tab. Your packaging design goes on top of it, so that when the box is cut and folded, your custom printing lands exactly where you want it. Every custom box starts from one – and we create yours free, sized to your exact product. Need to nail the dimensions first? See how to measure your product.
Print-ready file setup, in order:
- Request the correct dieline for the box style and dimensions.
- Place the dieline on its own layer, set to non-printing.
- Extend background art past the trim line by ~1/8″ (bleed).
- Pull logos, text, and barcodes inside the safe zone, ~1/8″ from trim and folds.
- Convert colors to CMYK or specify Pantone spot inks.
- Embed or outline fonts so nothing swaps at RIP.
- Flatten transparencies and export as high-res PDF/X-1a.
How to read a dieline
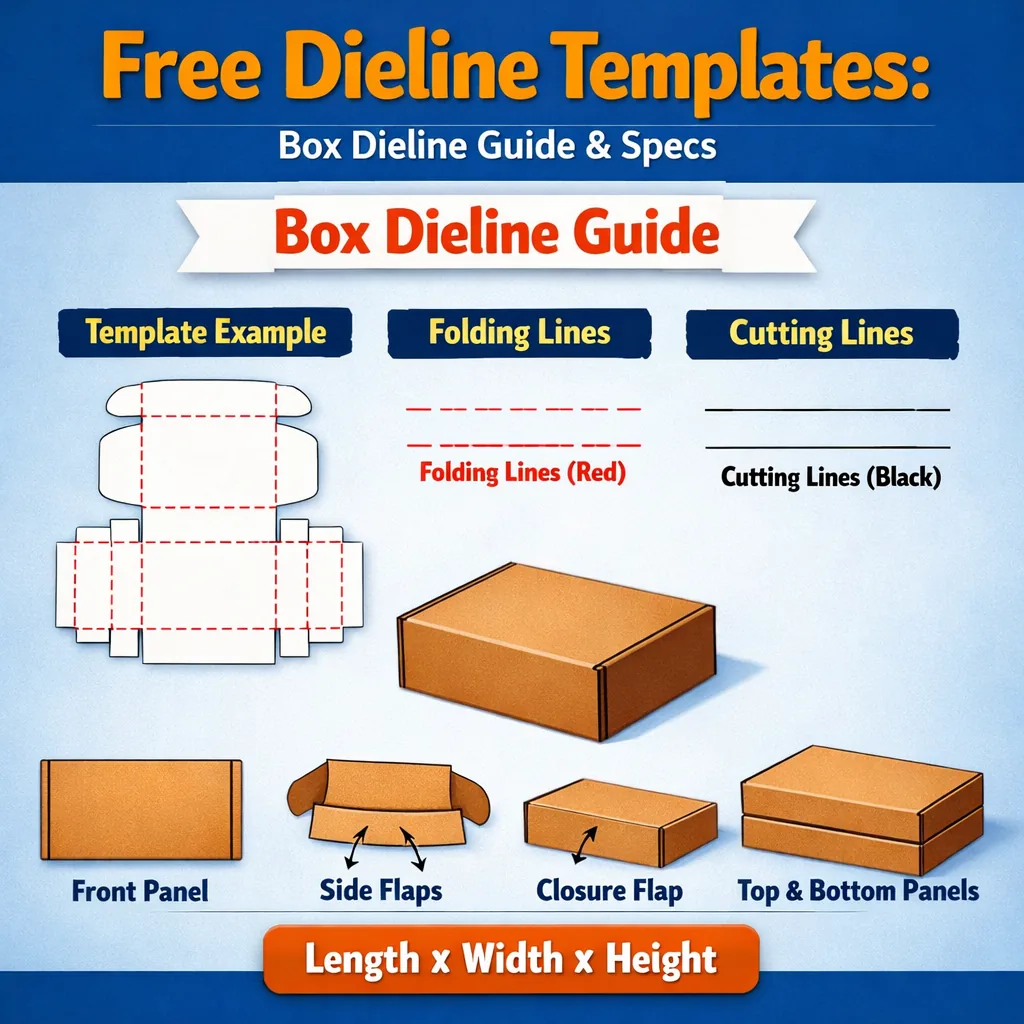
A dieline uses different line types to mean different things, and reading them correctly prevents the most common mistakes. Solid lines are cut lines – the actual edges of the finished box. Dashed or dotted lines are folds and creases, where the material bends rather than cuts.
Glue tabs are the flaps that get bonded to hold the box together, and you generally keep important artwork off them. When you design with these in mind, you avoid placing a logo across a fold. You also skip barcodes on a glue tab, where they would vanish into a seam.
One point that trips up first-time designers is how the panels relate to each other once the box is folded. On a flat dieline the front, back, sides, top, and bottom all sit next to one another in a single layout. On the finished box, they wrap around into three dimensions.
That means a panel printed on the far right of the dieline may end up right beside one from the far left. This happens once the material is folded and glued. Want a continuous pattern or a graphic that flows around a corner? Plan for where each edge meets its neighbor, not just how each panel looks on its own.
Reading the dieline as a folded object rather than a flat sheet is the habit that prevents most layout surprises.
Orientation matters just as much as placement. Every panel has a top and a bottom. It is easy to lay type on a lid or a bottom flap upside down or sideways, without noticing on the flat file. Before you commit, mentally fold the box in your head. Or ask us for a 3D mockup.
It shows exactly how each panel will read when the box is standing on a shelf. That single check catches rotated logos, mirrored text, and side panels that read back to front. All of these are invisible on the flat dieline. But each is obvious the moment the box is assembled.
Bleed, trim, and safe zone
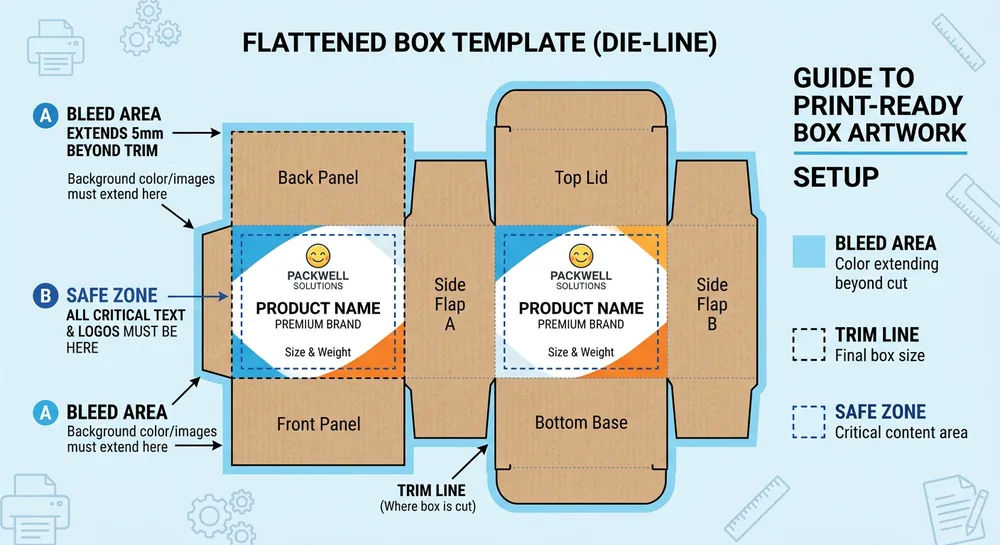
Three lines on a dieline matter most. Getting them right prevents white edges and cut-off text.
| Term | What it means |
|---|---|
| Trim line | Where the box is cut – the finished edge. |
| Bleed | Background art extended past the trim (usually about 0.125″) so no white slivers show if the cut shifts slightly. |
| Safe zone | An inner margin where you keep logos and text, so nothing important is cut off near the edge. |
Rule of thumb: background to the bleed, important content inside the safe zone.
It helps to understand why the bleed exists in the first place. No cutting process is perfectly precise: dies, blades, and the material itself can shift by a hair from one sheet to the next. Say your background color or image stopped exactly at the trim line.
Any tiny movement in the cut would then expose the bare edge of the board as a thin white line. Extending the artwork past the trim gives the cut somewhere to land. The ink never runs out, so the edge stays clean no matter how the sheet moves. The safe zone protects you from the same tolerance in the other direction.
Hold logos, text, and anything you cannot afford to lose a small margin inside the trim. That way, they survive even if the cut drifts inward.
The same thinking applies to folds, not just cuts. Creases can wander a little too. Keep critical elements a comfortable distance away from any fold line, as well as from the trim. Text that straddles a crease can look broken or distorted once the panel bends, and a logo centered right on a fold rarely looks intentional.
When in doubt, give your important content breathing room on all sides. Not sure whether an element sits safely? Send it over. We flag anything sitting too close to a cut or crease, before it becomes a reprint.
Vector vs. raster artwork
The file type affects how sharp your box looks.
- Vector (AI, EPS, or vector PDF) scales to any size without blurring – ideal for logos, type, and line art. It is the preferred format.
- Raster (JPG, PNG, PSD) is made of pixels and can blur if scaled up. If you use raster images, supply them at a minimum of 300 DPI at final size.
Color: CMYK and Pantone
Screens and presses show color differently. Set color up for print.
- CMYK is the four-ink print color model. Build artwork in CMYK rather than RGB (a screen model), since RGB can shift when printed.
- Pantone (PMS) spot colors reproduce an exact, consistent brand color across every run – the safest choice for a specific logo color.
If brand-color consistency matters to you, tell us your Pantone reference and we match it on press.
There is also the question of fonts, which quietly causes more reprints than most people expect. When you save a design file, the text stays “live” unless you convert it. So it depends on the exact font being installed wherever the file is opened.
If the press may not have that precise font and weight, the software may swap in a different one. Your carefully chosen type can then reflow, change spacing, or shift to a look you never approved. The reliable fix is to outline your fonts. That converts the letters into vector shapes.
They lock in place and no longer need the original font file. Once text is outlined, it prints exactly as you designed it. It can no longer be edited as type. So finish your copy first, then outline as a final step.
File format ties all of this together. Layered, editable formats work best. Native AI or a press-ready PDF keeps your vector art, your color settings, and your placement on the dieline. That is why they are the easiest for us to work with. Flattened image formats can still work when necessary, but they strip away the flexibility to correct small issues without re-exporting.
Whenever you supply a file, include any linked images. Do not assume they travel with the document. Keep your artwork on its own layer above the dieline, so the structure and the design never get merged by accident.
A quick file checklist
- Artwork placed on our dieline, on its own layer.
- Background extended to the bleed; text inside the safe zone.
- Vector art where possible; raster images at 300 DPI or higher.
- Colors in CMYK, with Pantone references for exact brand colors.
- Fonts outlined or supplied, and linked images included.
Not set up to do all that? You do not need to be – read on.
Common artwork mistakes to avoid
A few errors account for most reprints. Designing in RGB and being surprised when print colors shift is the classic one – build in CMYK from the start. Forgetting bleed leaves thin white slivers along the edges if the cut moves even slightly. Placing text too close to the trim risks it getting clipped – keep it inside the safe zone.
Using low-resolution logos pulled from a website (often 72 DPI) leads to fuzzy print; always supply vector or 300 DPI art. And leaving fonts un-outlined can cause type to reflow if the press does not have your font. Catching these before press is exactly what the proof stage is for.
What if you don't have artwork?
Most of our customers do not arrive with a print-ready file, and that is fine. Send us a logo and a description of what you want. Our free design team then builds the dieline and lays out a print-ready box for you. You then review a digital proof and 3D mockup before anything goes to press – so you approve the final look with no design bill.
It is part of how we keep packaging accessible, alongside no die or plate fees and a 100-box minimum.
The proof stage is where all of this preparation pays off, so it is worth treating your review carefully rather than rushing to approve. When your digital proof arrives, check the spelling character by character. Do the same for any phone numbers, web addresses, or legal copy.
A typo approved at proof will be faithfully reproduced across the entire run. Confirm that your logo colors look right. Make sure nothing important sits too close to an edge. Check that every panel is oriented the way you expect. The 3D mockup is especially useful here.
It shows the box as a shopper will see it. So you can catch an upside-down side panel or a graphic that does not line up around a corner, while it is still free to fix.
Think of the proof as your last and best checkpoint. Changes made at this stage cost nothing but a moment of attention, whereas the same change caught after printing means starting over. If anything looks off, say so. Maybe a color seems too warm, text feels cramped, or a fold lands in an awkward spot.
We will revise and send an updated proof until you are genuinely happy. Nothing goes to press until you give the final approval, so you are always in control of exactly how the finished box will look.
From file to finished box: what happens next
Once your artwork is approved, the workflow is straightforward. We prep the print-ready file on your custom dieline. Then we send a digital proof and a 3D mockup for your sign-off. We only move to press once you approve it. We print using offset or digital depending on your run size and color needs, then cut, fold, and glue to the dieline.
With an 8–10 day turnaround from a US-based facility in Cheshire, Connecticut, the path from approved file to delivered boxes is short and predictable.
Dig deeper: artwork & print-prep guides
For a closer look at a print-prep topic, see our focused articles:
- Dieline templates – how to use one.
- Bleed & safe zone – setting up print-ready artwork.
- CMYK vs. Pantone – getting brand colors right.
- Vector vs. raster – which file format to send.
Frequently asked questions about packaging artwork
Will you send me a dieline template?
Yes. We create a free custom dieline sized to your product. We can send it for your designer to work on. Or our team can do the layout for you.
What file format should I send?
Print-ready vector files (AI, EPS, or high-resolution PDF) are best. A high-resolution logo and a brief are enough to start if you do not have a full layout.
Why does my screen color look different from the print?
Screens use RGB light while presses use CMYK ink, so some shift is normal. Building art in CMYK and specifying Pantone colors keeps results predictable.
Do you charge for design help?
No. Design support and your dieline are free, and you always see a proof before printing.
How does a dieline turn a flat file into a folded box?
The press prints your artwork onto a sheet of paperboard exactly where the dieline places it. A cutting die then punches out the outline along the solid cut lines, scores the dashed fold lines so the material bends cleanly, and leaves the glue tabs intact. The flat blank is folded and glued along those creases, and every panel of art lands where you drew it on the flat file.
How do I choose between sending my own artwork and using free design help?
Send your own file if you have print-ready vector art on our dieline, in CMYK with Pantones called out, fonts outlined, and images at 300 DPI. Use our free design team if you have a logo and a rough idea but no dieline layout, or if you want us to fix bleed, safe zone, and orientation. Either way you review a digital proof and 3D mockup before press, so the final look is on you to approve.
What are the benefits of working from a proper dieline?
Every panel lines up when the box is folded, background art extends past the trim so no white edges show, logos and text stay clear of cuts and creases, and barcodes land on flat panels where they scan. It also lets you preview the box on a 3D mockup before anything prints, so rotated panels, upside-down lids, and mismatched corners get caught while they are free to fix.
What is the difference between bleed and safe zone?
Bleed is background artwork extended past the trim line, usually about 0.125″ beyond, so if the cut moves a hair no white sliver shows at the edge. Safe zone is an inner margin inside the trim where you hold logos, text, and anything you cannot afford to lose, so if the cut drifts inward nothing important gets clipped. Bleed protects the outside of the cut; safe zone protects the inside.
How much does it cost to have you prepare the print-ready artwork?
Nothing. Design support, the free custom dieline sized to your product, and a 3D mockup are all included with your quote. There are no die or plate fees on the 100-box minimum, so first-time brands can get press-ready artwork built and printed without a separate design bill. You approve the digital proof before anything goes to press.
Which file format is best to send for a custom box?
Vector AI, EPS, or press-ready PDF with fonts outlined is best – it scales cleanly and keeps color settings intact. If you only have raster art, supply it at 300 DPI or higher at final size. If you have neither, send a high-resolution logo and a short brief; we will build the print-ready file for you on the free dieline.
Is it worth learning dieline setup as a small brand owner?
For most small brands, no – our free design team handles the setup and you review a proof. But learning the basics of bleed, safe zone, CMYK, and outlined fonts pays off if you plan to iterate seasonally or run multiple SKUs, because you can send cleaner starting art and catch layout issues at proof faster. The dieline itself stays our job.
Ready to set up your packaging?
Whether you send a press-ready file or just a logo, we will get it print-ready. You get a free dieline, free design support, and a digital proof. No die or plate fees, and a 100-box minimum on any of our custom printed boxes and packaging. New to all this? Start with our beginner’s guide, then request your free quote or contact our team.